- Community
- Discussions
- Marketing
- Connecting the New Web Scheduler to Wordpress
- Subscribe to RSS Feed
- Mark Topic as New
- Mark Topic as Read
- Float this Topic for Current User
- Bookmark
- Subscribe
- Mute
- Printer Friendly Page
Connecting the New Web Scheduler to Wordpress
- Mark as New
- Bookmark
- Subscribe
- Mute
- Subscribe to RSS Feed
- Permalink
- Report Content
06-23-2022 08:33 AM
I was having a difficult time connecting the new web scheduler to my WordPress website. The difficulty is adding the onclick attribute to the buttons in WordPress without creating a bunch of HTML buttons.
I reached out to support and was told that there isn't a way to do it. Every resource I looked at online said that WordPress doesn't support onclick attributes like that.
This is not true, and I'll show you how! We just need some creativity and curiosity!
**NOTE: I'm not a developer or anything close. So there could be an even easier way.**
First, you'll want to copy and paste the first code into the <body> of your site. It should look something like this (you'll need to get your exact code to add. This one has fake information):
<script>
  (function(q,w,e,r,t,y,u){q[t]=q[t]||function(){(q[t].q = q[t].q || []).push(arguments)};
    q[t].l=1*new Date();y=w.createElement(e);u=w.getElementsByTagName(e)[0];y.async=true;
    y.src=r;u.parentNode.insertBefore(y,u);q[t]('init', '1ab23456-cdef-7890-123g-hijkl456mnop');
  })(window, document, 'script', 'https://static.servicetitan.com/webscheduler/shim.js', 'STWidgetManager');
</script>
If your theme doesn't provide the ability to do this like mine does, you can download a plugin called "Insert Headers and Footers" to get this done.
Next, you'll want to copy the following script and add it to the <head> of your site:
<script>
jQuery(document).ready(function(){
    jQuery( "#RequestForm" ).bind( "click", function() {
        STWidgetManager ('ws-open');
    });
});
</script>
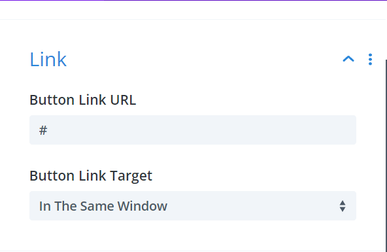
Then, you'll create a button in Wordpress, just like normal. For the link, you'll put "#" so it'd look something like this:
Finally, you'll set the ID of the button as "RequestForm" and save the button. It should look like this:
Now anytime you want to add a new button to pop up the webscheduler, you just add the RequestForm ID.
- Labels:
-
Web Scheduler
- Mark as New
- Bookmark
- Subscribe
- Mute
- Subscribe to RSS Feed
- Permalink
- Report Content
06-23-2022 09:54 AM - edited 06-23-2022 09:57 AM
Hey @mitchblackmon, this is a pretty creative solution for blocks. I passed it over to my Lead Developer and he had a couple of notes:
1. He recommended putting the script in the footer for best practice and to decrease load time
2. He recommended you use a CSS class instead of a CSS ID to select the button with jQuery. Since IDs are supposed to be unique it would be an easier update to use a "." instead of "#" (You would then need to remove the CSS ID and just add it to the CSS class field)
Here is the code block he passed over to me:
<script>
jQuery(document).ready(function(){
    jQuery( ".RequestForm" ).bind( "click", function() {
        STWidgetManager ('ws-open');
    });
});
</script>
For not being a dev, that's some pretty creative work - great job!
- Mark as New
- Bookmark
- Subscribe
- Mute
- Subscribe to RSS Feed
- Permalink
- Report Content
08-12-2022 06:03 PM
Can anyone comment on having 2 ST' instances....the code with a WordPress site can't open 2 different widgets, as its the same code....


